- Published on
From Fingersticks to CGM: A Complete Transition Guide
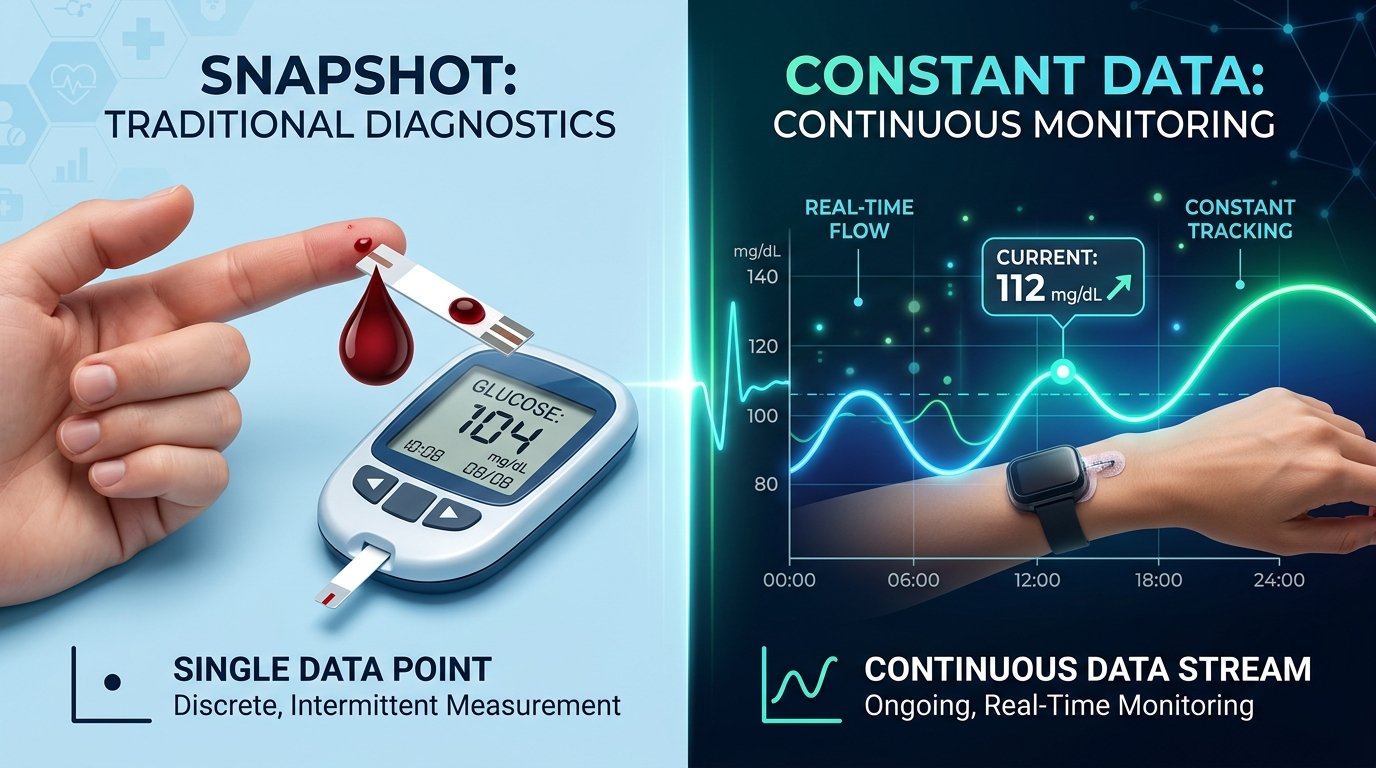
If you have been living with diabetes for a while, your fingertips likely have a story to tell. For decades, the "fingerstick" has been the gold standard—a brief, sharp pinch followed by a single data point representing a moment in time. But as technology evolves, many are making the switch to Continuous Glucose Monitoring (CGM).
Moving from testing 4 to 10 times a day to receiving a glucose reading every five minutes is a massive leap. It is like moving from looking at a few still photographs of your day to watching a full-length movie in high definition. While this transition is incredibly empowering, it also comes with a learning curve that is both technical and emotional. If you are feeling a mix of excitement and "data dread," you are not alone. Let's walk through how to navigate this transition smoothly and confidently.
Understanding the Shift: Blood vs. Interstitial Fluid
The first thing you must understand is that a CGM does not actually measure your blood. While a traditional glucose meter (BGM) uses a drop of capillary blood from your fingertip, a CGM sensor sits just under the skin in the interstitial fluid. This is the fluid that surrounds your cells.
Because of this difference, your CGM and your fingerstick meter will almost never show the exact same number. Think of it like a train: the locomotive is your blood glucose, and the caboose is your interstitial fluid. When the train is moving on a flat track (stable blood sugar), the engine and the caboose are at roughly the same point. However, when the train starts going up a steep hill or zooming down a valley (rapidly rising or falling blood sugar), there is a delay.
This is known as "lag time." Usually, the CGM is about 5 to 15 minutes behind the actual blood glucose level. Understanding this lag is the key to avoiding frustration during your first week.
Setting Expectations for Accuracy: The 20% Rule
One of the biggest hurdles for new CGM users is the "trust factor." You might feel the urge to double-check every CGM reading with a fingerstick. When you see 110 mg/dL on your CGM and 130 mg/dL on your meter, your first instinct might be to think the CGM is "wrong."
In the world of glucose monitoring, we use the "20% rule." Clinical standards for both BGMs and CGMs allow for a 20% margin of error compared to a laboratory blood test. This means if your actual blood sugar is 100 mg/dL, a reading anywhere between 80 and 120 mg/dL is considered accurate.
When to Trust Your Fingerstick Over Your CGM
While the CGM is a powerful tool, there are specific times when you should still reach for your traditional meter:
- During the first 24 hours: New sensors often need a "warm-up" period to calibrate to your body’s chemistry.
- When symptoms don't match the data: If your CGM says you are 140 mg/dL but you feel shaky and sweaty (signs of a "low"), always trust your symptoms and verify with a fingerstick.
- Rapid changes: If you see double "up" or "down" arrows on your CGM, the lag time is at its peak. Use a fingerstick for treatment decisions like dosing insulin or treating a crash.
- Extreme highs or lows: CGMs are generally less accurate at the very high and very low ends of the spectrum.
Managing the Psychological Shift: From Data Gaps to Data Overload
Perhaps the most underestimated part of the transition is the mental impact. For years, you might have had "blind spots" between meals or while sleeping. Suddenly, you can see everything. You see how that "healthy" oatmeal sends you to 200 mg/dL, or how a stressful work meeting causes a spike.
This constant stream of information can lead to "data fatigue" or "alarm anxiety." It is easy to become obsessed with the line, checking your phone every few minutes. Here is how to manage the mental transition:
1. Focus on Trends, Not Numbers
The real magic of a CGM isn't the number; it's the arrow. Is your glucose 150 mg/dL and stable, or 150 mg/dL and rising fast? The trend arrow helps you stay ahead of the curve, allowing you to make small adjustments rather than large, reactive corrections.
2. Customize Your Alarms
When you first get your CGM, the default alarms might be too tight. If your phone beeps every time you hit 140 mg/dL, you will quickly become frustrated. Start with wider ranges (e.g., 80 mg/dL to 200 mg/dL) and gradually tighten them as you become more comfortable with your patterns.
3. The "Waiting Rule" for Corrections
One common mistake is "stacking" insulin or food. You see a high number, you bolus, and 20 minutes later the number hasn't moved, so you bolus again. Because of the lag time and the time it takes for insulin to work, this often leads to a severe low later. Always wait at least two hours before "correcting" a high seen on a CGM unless your doctor advises otherwise.
Practical Steps for a Successful First 14 Days
Transitioning is a marathon, not a sprint. Here is a roadmap for your first two weeks:
Days 1-3: The Observation Phase
Don't try to change your entire life in the first three days. Your goal is simply to keep the sensor on and watch. Observe how your body reacts to your "normal" routine. You might be surprised to see that your blood sugar stays high for longer than you thought after dinner, or that it dips significantly at 3:00 AM.
Days 4-7: Identifying Patterns
Start looking for "why." If you see a spike every morning at 8:00 AM, is it the coffee? The cereal? Or perhaps the "Dawn Phenomenon" (a natural rise in blood sugar as the body prepares to wake up)? This is where using a glucose tracking tool like GlucoAI can be incredibly helpful. By logging your meals and activities alongside your CGM data, the AI can help you identify triggers that aren't obvious to the naked eye.
Days 8-14: Making Informed Adjustments
Now that you have a week of data, consult with your healthcare provider. Use the "Time in Range" (TIR) metric rather than just focusing on your A1C (average blood sugar level over 3 months). A1C is an average, but TIR shows you how much of your day you actually spent in a healthy zone.
Troubleshooting Common Transition Issues
The "Compression Low" If you wake up to a terrifying alarm saying your blood sugar is 40 mg/dL, but you feel perfectly fine, you might have experienced a compression low. This happens when you lay directly on the sensor, pushing the interstitial fluid away from the site. Always double-check a sudden nighttime low with a fingerstick before eating a kitchen's worth of snacks.
Skin Irritation Some people find the adhesive on CGM sensors irritating. If you notice redness or itching, try using a "barrier spray" or a specialized medical adhesive patch over the sensor. Keeping the area clean and dry before application is essential for the sensor to stay on for the full 10 or 14 days.
Sensor Accuracy and Hydration Since the CGM measures interstitial fluid, your hydration levels matter immensely. If you are dehydrated, the fluid levels drop, and the sensor may struggle to get an accurate reading. Drinking plenty of water is one of the simplest ways to improve CGM performance.
Summary: Your New Toolkit
The transition from fingersticks to CGM is a journey from "guessing" to "knowing." While the technology is sophisticated, the goal remains the same: giving you the freedom to live your life without diabetes being the constant center of attention.
Key Takeaways:
- Expect a lag: Remember the "Train Analogy"—the CGM is 5-15 minutes behind your blood.
- The 20% Rule: Don't panic if your BGM and CGM don't match perfectly; they are both within an acceptable range of accuracy.
- Symptoms first: Always trust how you feel over what the screen says. If in doubt, do a fingerstick.
- Focus on trends: Use the arrows to make proactive, not reactive, decisions.
- Be patient: It takes about two weeks to truly understand your data patterns.
Making the switch is a significant step in your health journey. To make the most of this new wealth of information, consider using a diabetes management tool like GlucoAI. By syncing your data and logging your lifestyle habits, you can transform those "lines on a graph" into actionable insights that lead to a better A1C and more energy.
Always remember to consult your doctor before making significant changes to your medication or treatment plan based on new CGM data. You’ve got the technology—now you have the knowledge to master it!
GlucoAI — Smart Blood Sugar Monitor
Track, analyze, and optimize your glucose levels with AI-powered insights.